Bright and Beautiful

Bright and Beautiful

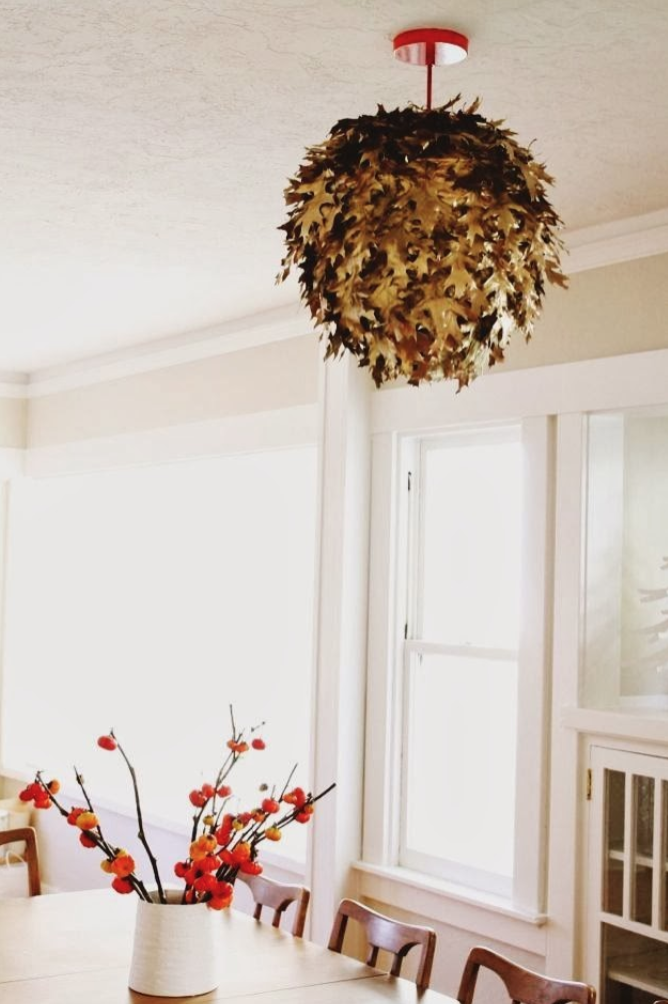
I promise this is not evolving into a party blog...I'll leave that to the experts. My dear friend Coco is having herself a little party this weekend to celebrate the 10th anniversary of her 30th birthday, and her husband Jim asked me to help out with "the look". Coco is a natural beauty, she is kind, sincere, and a appropriately goofy. When we lived in Montclair (Oakland), we were their down-the-hill neighbors, our kids are friends, and we spent several days a week at each others houses. Our moving away was pretty hard on both of our families, so we were beyond excited when Jim took a counseling job at the junior college up here - they'll be our neighbors once more this summer! Right around the time we moved, Coco bought the supplies for us to make one of my paper lanterns together, but we never got around to it, so I'm surprising her with this gilded version for her birthday. The party is at Campovida's Oakland tasting room, a reclaimed wood and brick clad space, located near Jack London Square. I went for a Kate Spade inspired palate of gold, fuchsia, royal blue, and teal. I found these sparklers in the same colors for a little late-night fun, and we're doing a photo booth including big white C O C O prop letters set against a pretty gold sequined backdrop. The be-tasseled lantern will hang prominently with more draped garlands and some giant clear balloons filled with gold confetti placed around the room. To make the paper lantern watch this video tutorial, glue in a second layer of smaller papers, and apply multiple light coats of gold metallic spray paint, and check out the how-to for tassel garland below.

Read More

The Fallen Leaf Lantern

The Fallen Leaf Lantern

I don't know if I ever formally announced this on Poppy Haus, but I started a visual display internship with Anthropologie last month; the best part of which is the opportunity to create three dimensional art installations out of ordinary materials "as a job", because as you know, I really like doing it for my home. Today's post has been in the works and a little delayed because of my ever tightening schedule with school, interning, blogging and kid wrangling.  I am very excited to share this new paper lantern project, particularly because it's a project that you can do with kids, at least the leaf collecting part (we got our leaves from Jasper's school). The lantern can hang from a string or can be illuminated with a light cord. Here are some more pictures and a tutorial. 

Read More

The Paper Lantern

The Paper Lantern

I leave for vacation today, and will return to the blog in Mid-July.  I thought I'd leave you with a new video post, this time a project. My paper lanterns have been featured on Design Sponge, in magazines and at Alt Design Summit, but believe it or not, I've never done a tutorial here on Poppy Haus! When I started showing my projects, I didn't know that I needed to include tutorials. So, I made a short video to show you how I make a basic lantern. You can use any size white paper lantern, any size cupcake liner. If you want, you can layer the larger papers with a striped mini-liners to add dimension, or try using french pastry papers

Read More

Playing It Forward

Playing It Forward

Wow. This was a crazy week for me. I had 2 tests, a paper due and a ton of homework, plus a bunch of paperwork to deal with, and you know, some posts to get out, and some kids with stomachaches. I thought maybe I'd cheat a little and share my DIY for Playful Learning. It's a simple project that you can do with your kids, using my old stand by, a rice paper lantern, and a paper grocery bag.  Check out the full tutorial on their site. Have you ever visited Playful Learning?  In addition to arts+crafts, they have inspiring educational content, e-courses, and an e-book. I'm really quite proud that I get to be a contributor for them... 

Read More

Round Too

Round Too

Confession.  I sold my cupcake paper chandeliers in successive transactions on Etsy last month, and because I was going out of town when the orders were placed, I literally sold the pair hanging from my ceiling.  I meant to replace them, but I also wanted to try out a new idea I had for a larger, single chandelier for our new dining room space in Petaluma.  Using the same technique as the Anenome version, this time using 3" deep wrapped parchment paper baking cups, I paired the chandelier with a red fabric cord and ceiling fixture from West Elm. I left off the center papers on this piece, because the light is much more diffused.  To tell you the truth, I like this one more, and I think it looks more like the Rhododendron chandelier from Anthropologie.  For the tutorial, just reference the original post.

Read More