Photo Bomb
/
When we get all dressed up and fancy without our kids, as in never, I usually try to take at least one photo to remind myself of my youth, and to use as a totally realistic Facebook profile pic. I know I'm not alone.
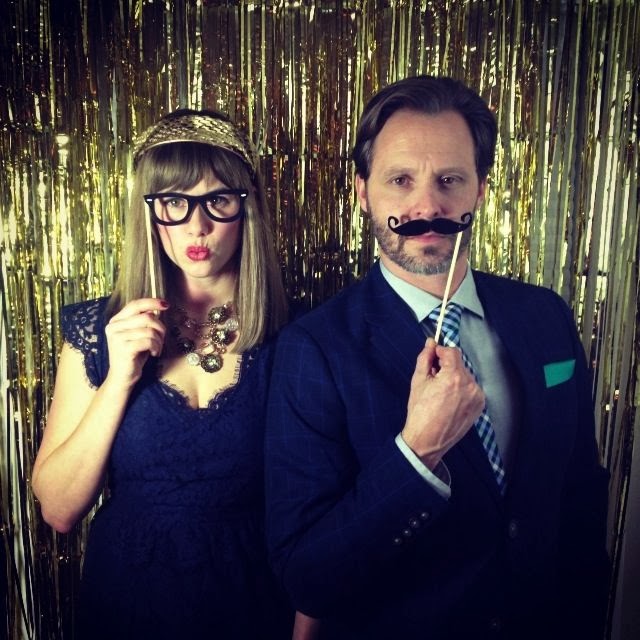
So for Adam's birthday party, I got to work making a photo booth, so that everyone could get a pretty shot of themselves dressed up. I didn't have a professional photographer, and I had to combat the nighttime lighting which can be either too dark or stark/artificial, so I had to think through the easiest way to make it work. I thought I'd share some tips for making a photo booth for evening-time soirees. Academy Awards party?
1. Keep the back ground simple. I love the tutorials for hand painted back drops for daytime parties, but at night, either shiny metallic, sequined or lustrous velvet looks best. This is because of lighting, and formality. I layered three party store gold curtains against a white wall for my booth, inexpensive and easy.
2. Lighting. It cost me $35 to rent two lights, on stands with umbrellas. I sourced them from my local camera store. Direct the light at chest height so that it will bounce up to the face. If you do not intend to have a dedicated camera, ask for lights that just remain on, without a strobe.
3. Use Instagram. Here's why: you can create a hashtag, so that everyone at the party can take their own pictures, pictures that they are happy about and want to share. At the end of the night you have a cache of party photos of everyone looking their best. Also, no one has to man the camera, and the tripod won't take up any space/get knocked into.
4. Suggest a pre-selected filter and hashtag. For Adam's party, I told everyone to use the X-Pro II, because it made the gold pop, and gave a nice complexion. The pictures look cohesive, like they were taken with the same camera. I assigned the hashtag #adamis40, and voila.
5. Props. Not everyone has to use them, but they do encourage people to have fun. I'm always a fan of glasses and staches on a stick. Here's
from last Valentine's day for making your own.
And there you have it, party on.